 |
| Holiday Card Holder from PotteryBarn.com |
My favorite stores include Restoration Hardware,Williams Sonoma and Pottery Barn. Often I can be found curled up in my favorite plush red velvet arm chair longingly browsing their catalogs, thinking of ways I can imitate the chic farmhouse look without having to pay the chic boutique prices.
This Holiday Card Holder can be found on the Pottery Barn
website (or catalog) for the 2011 Holiday Season. In years past I have taped my cards from family & friends to cabinets in the kitchen, paper clipped them to twine, or tucked them anywhere I could to display the beautiful works of art.
That is, until now. This year, cards sent to my home (and yours!) can have a home of their own with this 6" x 72" DIY Pottery Barn inspired Holiday Card Holder.
Craft Ingredients:
Large gauge spool of wire (
any major home repair store)
Wire cutters
Electrical pliers
Safety Glasses
Yard (Meter) stick
Floral wire (
optional)
Black spray paint (
optional)
Craft Directions:
1.) Measure & cut 5 strands of the large gauge wire at 80" in length. Four (4) of the strands will be the main body of the holiday card holder.
 |
| Steps 1 & 2. |
2.) Measure 4" from one end of the group of four (4) strands, and using the 5th cut strand of large gauge wire, wrap around the group of 4 strands three times. This can be done either by hand or using the electrical wire pliers. Repeat every 12", or one foot. There should be more wire left open, or un-wrapped, at the top of the Holiday Card Holder.
 |
| Step 3. |
3.) Now that the body of the Holiday Card Holder is in place, use the electrical pliers to curl the bottom of the four strands of large gauge wire. Repeat step 3 with the top of the strands of the large gauge wire.
4.) Using your yard stick, measure and cut three (3) strands of large gauge wire at 64". The wire for this step can be substituted with floral wire, though not shown in the pictures of this project.
 |
| Step 5. |
5.) Beginning at the bottom of the Holiday Card Holder, wrap one (1) strand of wire around the body two times, and then make a loop two times to one side. Wrap wire around body once, and make a loop two times to the opposite side, as shown in picture. Repeat until wire is completely wrapped around the body of the Holiday Card Holder. Repeat Step 5 two more times with each remaining strand of wire. (HINT- the shorter wires allow ease in creating the loops and wrapping around the body of the holder. One long wire is REALLY difficult to work with as it easily becomes tangled with everything it comes in contact with.)
6.)
Optional Step. If you used floral wire to make the loops on either side of the Holiday Card Holder, now would be the time to spray paint the holder black to give it a unified look.
 |
| Finished Product. Looks JUST like the one from PB! |
All in all, this project only took me 2 hours to make and I didn't have to spend the $49 price tag at Pottery Barn to create a home for my holiday greeting cards.
Thanks for stopping by! Please feel free to leave a comment or post a question. :) Kristen
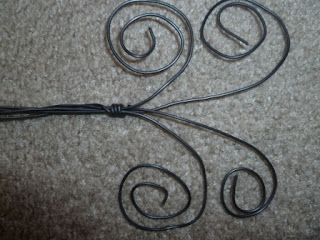
 |
| Close up of Finished Product. |


