Thursday, January 26, 2012

14 Days of Valentines

14 Days of Valentines
Every year for the last three years I do what we have come to call, "The 14 Days of Valentines". Each day from February 1 to February 14 I create a reason I love my husband of 8 years (I know, we're still newbies!).

I got this idea while living in Holladay, Utah where fourteen neighborhood women would get together for a Pre-Valentines Day Party. Each party-goer made fourteen identical valentines to share with the other party-goers. We each took a turn explaining what we made and why we made it, and then had a good laugh enjoying one another's creativity.

I have since moved and although many of my new neighbors aren't interested in doing a Pre- Valentines Day Party with a Valentine Exchange, that doesn't mean my husband has to go without, right?

Hopefully my husband doesn't read today's post because I am sharing with you my 14 Days of Valentines that it may give you a few ideas for you to shower your special someone(s) with a creative I Love You.

Now, all you have to do is go buy the goodies and secretly lay them about the house, car, backpack, lunch sack, office, whatever! for your special someone to find.

Also don't forget to check out these other great posts by Crafty Betties Joana and Tamie.


York Peppermint: We’re Mint to be!  
Army Toy: Love is a Battlefield

Rolos or Lifesavers wrapped in red paper: You’re the Bomb

Hand Shovel with Candy: I dig you!

Paper Airplane: You make my heart soar

Flip Flops: You are the Flip to my Flop

Fav Brand of Peanut Butter: You are the Peanut to my Butter

Bouncing or Paddle Ball: You make my Heart Bounce

Fish Crackers: Will you o’fish’aly be my valentine?
Toy Car: I “Wheelie” Like You

Honey Bear: Bee Mine

Favorite Soda: You make my heart bubble

Candy Worms: You wormed your way into my heart

Fav Candy: You’re sweet


Tuesday, January 24, 2012

How do they do that? Piping Gel Pattern Tranfer

Ever seen someone make a cake with a picture on it and you wonder just how it's done? Do you think that they must be really good artists to freehand a character or shape onto the cake? Well, I am here to burst their little bubble. It isn't about talent its about tools!

Supplies required:

Cake, leveled and iced
Piping bag with coupler and a #1 or #2 tip
Small, dry artists paintbrush
Parchment Paper
Design you wish to put on cake
Pen or marker
Piping Gel (wilton makes this)
Icing coloured to choice in piping bags with appropriate tips


First thing you will need is a picture to copy. The simpler the better. You will also need your pen or marker and your parchment paper. You place the parchment paper over the image and trace it with your pen. Then here comes the magic! You have to turn your image over so you don't touch the side you marked on. Take your bag with the #1 or #2 tip and put some piping gel in there. Take that piping bag and go over what you just traced! Once your image is completely outlined in piping gel take the parchment paper and line up where you want your design on the cake. Then, take your artists brush amd lightly go over the design again so you are pressing the icing gel onto the cake. Once you are done you can pull off the parchment and your design will be transferred onto your cake. Then you can go ahead and fill it in as you see fit!


This cake is done with this technique. First time attempted. You can do it too!


Thursday, January 19, 2012

Quality Time With Your Spouse AND a free printable

We all know that it is coming.
It is inevitable and (pretty much) unavoidable.
Do you know what you're going to do for it?

Valentine's Day is a little less then a month away.

Some people have a difficult time with the Valentine's Day holiday.
I've heard: "You shouldn't need a holiday for you to show that you love your spouse/S.O."

True.
Extremely true.
However, I look at it as a oportunity to show a little bit more love.
Shower a little bit more kindness on my husband.
(....now granted, it doesn't always work out that way, but I do try!)
--and my kids!

I saw this saying on Pinterest and really fell in love with it.
So I decided to make it pretty.
And give it to YOU!
FREE! free! FREE! printable


But before we get into that, I thought that I would share some ideas on dates with your spouse;
and ways to let your spouse know that you love them and are thinking of them;
So take notes (or save the links...) and get at it!


I loved this link!
50 questions to ask your spouse on a date.
We've all been there. Sitting across from the person you love and have pledged the rest of your life on this earth to; and you DON'T KNOW WHAT TO SAY!!!!!
double-yikes!
That shouldn't happen. But it does (my hand is raised).
So check it out and bring the list along on your next alone-time.
This one from pink pistachio

Is all about "penny jar dates"
Inexpensive time with your spouse.
We can all use a little quality time, but not spend a lot of money, eh?

I need this list

101 ways to tell your husband that you love him.
Notes in the lunch box aren't bad....but sometimes we need a little jolt to get more creative.

Now onto the FREE stuff.
Like I said earlier, I really, really liked this saying.
Most likely because I need to remember to make sure that I am being my husband's favorite part.
Just click on the link below each picture and you will be able to save your own copy.
Happy Valentine's Day!


pink
 
red
 
yellow


Monday, January 16, 2012

'Cheater' Scrapbooking


I've been trying to think of all of my favourite crafting things what to share with you today, and realized I haven't probably bragged nearly enough to the world about this fabulous tool I use when I want to get a bunch of pictures dealt with in a hurry.

May I introduce you to Studio J.

I love it. It's an online-based design software (from Close To My Heart) that allows you, without any purchase or committment, go in and play with your photos and scrapbook designs. AND if you DO want to use it to actually enhance your scrapbooking, you pay per printing - no expensive software to save up for or installation to fumble through - it's EASY EASY EASY.  I can literally do an entire two-page scrapbook layout in 5 minutes.

Like this one:

Or this one:

I use it to supplement the papercrafted scrapbooking I do, so like, my daughter's first-year scrapbook is a combination of what I spent hours labouring over, and then what LOOKS like I spent hours labouring over, but took no time at all.

Like this:


One day I was sick I spent on the couch and did I think 15 layouts in a few hours. It was great!  And another project I've been chipping away at is getting my 400+ wedding photos all "scrapbooked." I dunno, what do you think?  (You can click on them each to make them bigger and see the super cool techniques you can do!)


I love it because I take LOTS of pictures, and then all my digital photos end up dumped on a computer somewhere in the house and never get looked at! But if I take a little bit of time each month I can get my photos scrapbooked, and out in my living room so that we and our visiting family can enjoy flipping through them all. It's FABULOUS.

Anyway, sorry it's not a technique, or a here's-how-to-do-this post today - promise I'll do one of those next time I'm posting. But this is one of my FAVOURITE things and therefore, you absolutely had to know about it! hahaha  'Cause you know, I'm full of self-importance like that! hahaha

Watch this fabulous how-to video that takes you from start to finish of a beautiful two-page layout in just over 7 minutes (and that's with instruction time!)

 and then access Studio J here* to create your free account and get started! Because why take all those pictures to never share them with anyone??

(Yes, I'm a freaky scrapbook lady.  Yes I am okay with that about myself. hahaha JOIN me! It's FUN!)

That's all for now! Cheers!


*if you're in the States or somewhere else outside of Canada and have trouble using the above link to access Studio J try this, and please leave a comment to let me know! I've never tried it from somewhere else before! You can absolutely use it, just may need a consultant in your country to help you out. Maybe. :-)

Monday, January 9, 2012

DIY Restoration Hardware Mercury Glass Short Table Lamp

19th C. Vintage Mercury Glass Lamp from Restoration Hardware
Mercury glass was first created during the mid- 19th century for those who could not afford Sterling Silver. Known as "poor man's silver" for its inexpensive artistic value, mercury glass was made more for display purposes and not for utilitarian uses, like tableware.

Mercury glass has reemerged as a popular home decor item over the last few years by companies like Pottery Barn, Williams-Sonoma and Restoration Hardware. My inspiration today comes from a Vintage Short Table Lamp sold at Restoration Hardware for $225 (not counting the $25- $100 lamp shade). Never being one willing to pay even 50% of retail pricing, I've done the research to learn how to make this at home for a very small fraction of the price. I suppose one can say my "poor man's silver" is really cheap!

Many DIY-ers out there (including Martha Stewart) will say that a DIY-er should 1.) spray water on the interior of a glass vase and then, before the water dries, 2.) spray Krylon Looking Glass Mirror Spray Paint (found at hardware store for $3.98) over the water droplets on the interior of the vase. Though this does mimic the look of mercury glass, I found the vase looks "new" and not "vintage". To recreate the Restoration Hardware inspiration lamp, I would need to spend time chipping/ flaking the paint off to give it the worn look I wanted.

After trial and error, here is what I found that worked, and you tell me if you think the look is similar:


Craft Ingredients:

Glass Vase/ Hurricane from Thrift Store (upcycle/ recycle if you can!!)
Silver Leaf Adhesive
Sand Paper (optional)
Spray-On Leaf Sealer
Krylon Looking Glass Mirror Spray Paint (was still useful!)
Lighting Kit (hardware store)
Drum Lamp Shade of your choice (any store)

Craft Instructions:


1.) Clean your hurricane or vase thoroughly with warm soapy water and allow plenty of time to air dry.

2.) Cover the inner surface of vase with Silver Leaf Adhesive. Let it sit for 10- 15 minutes.

3.) Apply rub-on silver leaf sheets in patches to the glass, making sure to leave plenty of uncovered areas for a vintage, flaky look.

4.) Optional Step: For a more "roughed up" look, use sand paper and strategically scratch off some of the silver leaf.

5.) When silver leaf looks they way you want it, then coat the inner surface with spray-on leaf sealer. Allow to dry for 30 minutes.
 
Step 6. Allow to Dry.


6.) Lastly, spray 2 or 3 light coats of Krylon Looking Glass Mirror Paint over the silver leafing to smooth out the mercury glass look. Allow to dry over night.

7.) Assemble lighting kit following manufacture's directions and insert into dry vase.
Step 8. Assemble Lamp.

8.) Apply shade and add light bulb to your inserted light kit/ vase and viola! You have a new custom made lamp!

When I added the receipt totals together for this project, I spent about $32 instead of the Restoration Hardware Mercury Lamp price of $225 + shade. Why pay $250- $325 for a chic lamp if it can be made for pennies of the actual price?
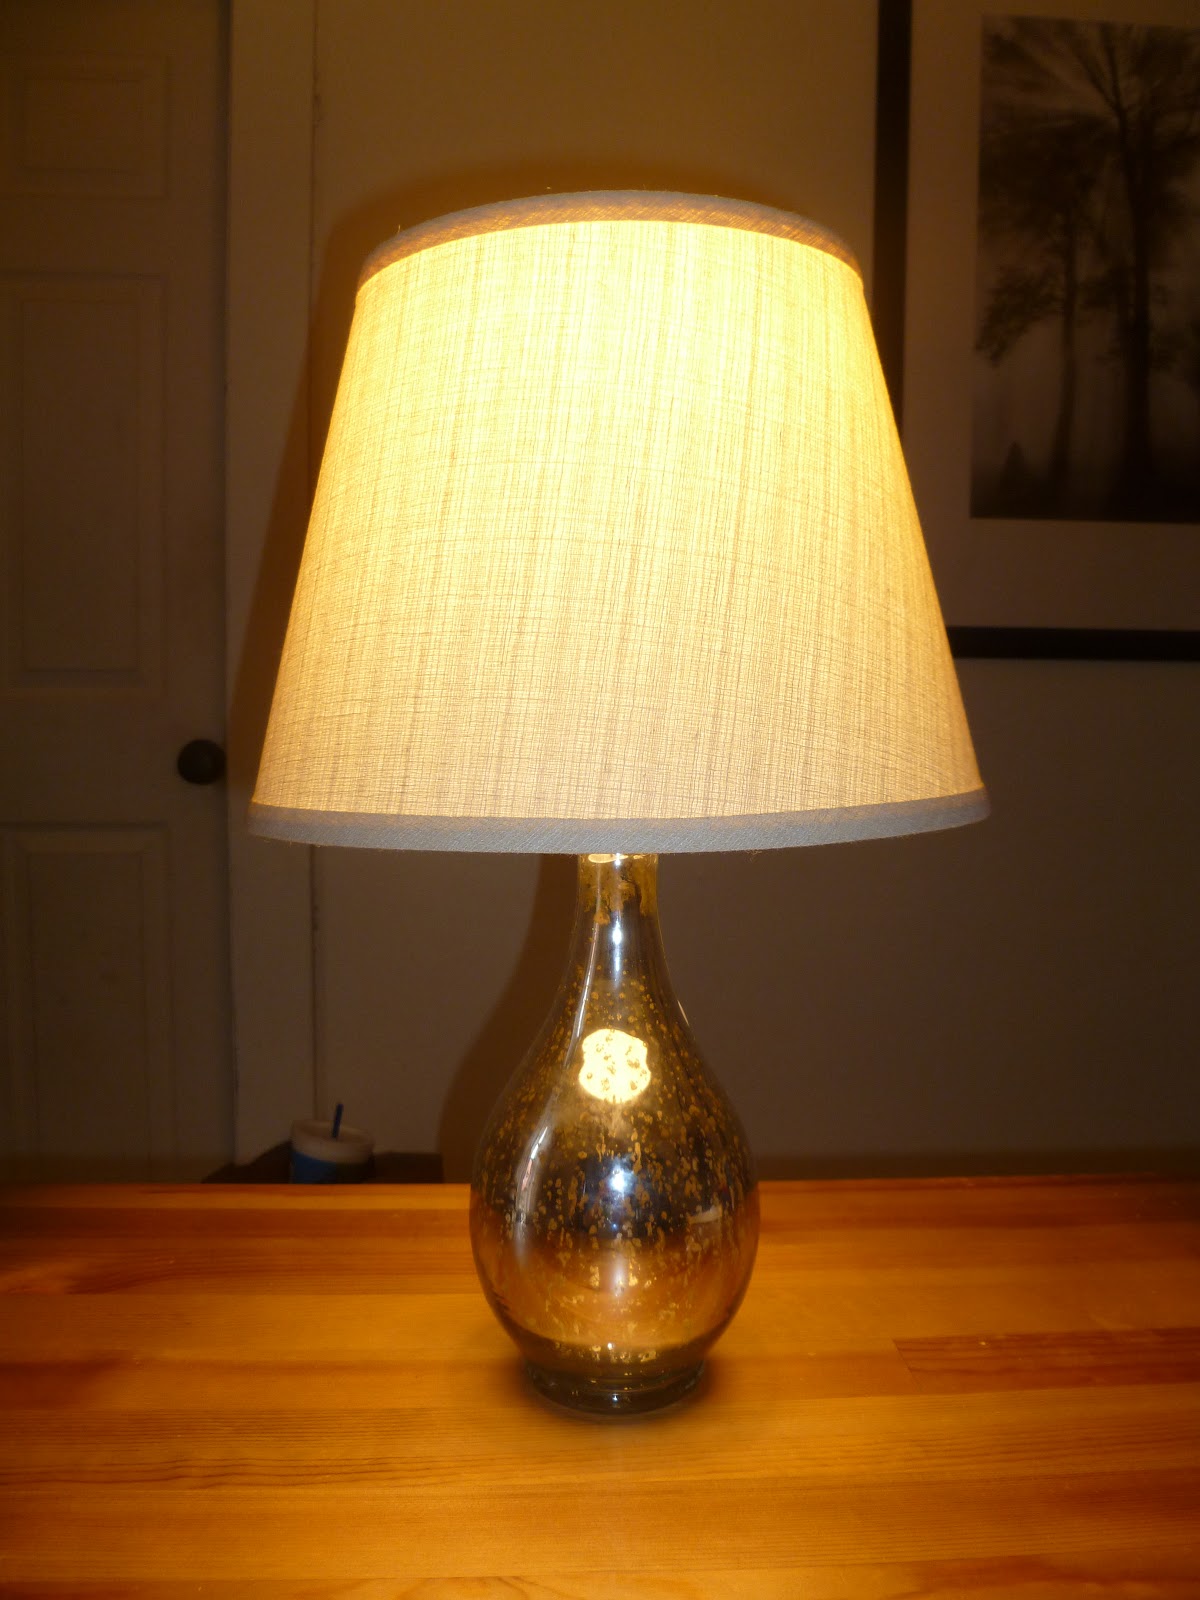
My Mercury Lamp: 1/10 the price of the inspirational lamp.

I LOVE the lamp but want to know what YOU think! Please comment on anything... mimic; technique; difficulty; other projects you suggest to create using mercury glass; etc.


Thanks for reading and happy DIYing! :) Kristen

Thursday, January 5, 2012

The Perfect Swirl

Cupcake stores it seems are all the rage these days. They have wonderful interesting flavours and they look like perfection. The problem is that at at least $2.50 per cupcake it can get a little steep when you have a lot of people to feed. So today I thought I would answer another question I frequently get asked: How do you get that swirl on the top of the cupcake? I have to say.....it's far easier than you can imagine and the results are fantastic.

Supplies:
Cupcakes
Your favourite buttercream icing (make a nice big batch...it takes a lot of icing)
Piping Bag (the bigger the better)
a 1M Tip (this is whats gonna do the magic)

Now I highly suggest using buttercream for this vs other icings. Buttercream holds its shape better whereas a cream cheese icing (for example) is more likely to look like its melting on you.

You take you tip and drop it into your piping bag. It is a bigger tip than normal and no coupler and ring are required. Then you fill your icing bag.

Hold your piping bag at a 90 degree angle and about a 1/4" away from the cupcake. Start moving around the cupcake in a spiral motion starting from the outside and working your way to the center of the cupcake. Be careful to not leave gaps. Once you have reached the center stop pressure and pull the tip away. Feel free to top with any sort of small decoration if desired.


And there you have it. Easy peasy and you have professional looking cupcakes! Enjoy

my first cupcake...it really is that simple!

(technique photos courtesy of Wilton.com)

Monday, January 2, 2012

Routine -- a little bit better

Happy New Year!
Do you have any resolutions for 2012?
It always seems as though I do; and then half-way through the year
(and sometimes a few weeks into the new year),
I forget all about them.

In honor of the new year, I am going to share with you something that has made the morning routine for my boys and I a little bit less angst-ridden.
--And hopefuly help you be a little more organized as your kids start school up again this week.


I started a morning checklist with my oldest last year when we went to the pediatrican for input on some ADHD tendancies he was exhibiting.
She suggested that we try a checklist for morning and before bed to help him (and us) not be so agitated.

I think that we, as adults, sometimes feel that our kids -- especially our older ones -- should be able to remember what to do every morning.
I mean, good grief; they do it
every. single. day.
It's not like it is a surprise that they have to brush their teeth, or put their lunch in their backpack.
However, kids have wandering minds.
They actually do have a difficult time staying on track and remembering what needs to be accomplished before they head out the door (or go to bed) every day.

Hence a tad bit of agitation from mom -- because son should be able to remember to do all these things, and he doesn't and so I'm constantly reminding him when I'm busy getting everyone else ready --
--and from son because he's just trying to do everything right and feels like mom is constanly nagging him
(sound familiar?)

Ahhhhhh --- in comes the solution!

This is extremely basic and simple.
But it is effective.

I paste the morning and bedtime schedule back-to-back; laminate and put magnets on with a dry erase marker attached so that they are in charge of their schedule.

All mom or dad has to do is ask: "Have you completed everything on your list?"
And the kids love to check off their list and see it completed.


Feel free to print these off for your use. You can find them right HERE.
Or create your own.

I've also found other "chore charts" in the blogosphere that you could use.
This one is really cute; using magnetic pictures that your kids can move from the "to-do" side to the "done side"

Lil' Luna shares her tutorial for this magnetic chore chart here.

Good luck in the new year and may you be a little more organized and stress-free as your kids begin school again!