Showing posts with label Holiday. Show all posts

Thursday, January 26, 2012

14 Days of Valentines

14 Days of Valentines
Every year for the last three years I do what we have come to call, "The 14 Days of Valentines". Each day from February 1 to February 14 I create a reason I love my husband of 8 years (I know, we're still newbies!).

I got this idea while living in Holladay, Utah where fourteen neighborhood women would get together for a Pre-Valentines Day Party. Each party-goer made fourteen identical valentines to share with the other party-goers. We each took a turn explaining what we made and why we made it, and then had a good laugh enjoying one another's creativity.

I have since moved and although many of my new neighbors aren't interested in doing a Pre- Valentines Day Party with a Valentine Exchange, that doesn't mean my husband has to go without, right?

Hopefully my husband doesn't read today's post because I am sharing with you my 14 Days of Valentines that it may give you a few ideas for you to shower your special someone(s) with a creative I Love You.

Now, all you have to do is go buy the goodies and secretly lay them about the house, car, backpack, lunch sack, office, whatever! for your special someone to find.

Also don't forget to check out these other great posts by Crafty Betties Joana and Tamie.


York Peppermint: We’re Mint to be!  
Army Toy: Love is a Battlefield

Rolos or Lifesavers wrapped in red paper: You’re the Bomb

Hand Shovel with Candy: I dig you!

Paper Airplane: You make my heart soar

Flip Flops: You are the Flip to my Flop

Fav Brand of Peanut Butter: You are the Peanut to my Butter

Bouncing or Paddle Ball: You make my Heart Bounce

Fish Crackers: Will you o’fish’aly be my valentine?
Toy Car: I “Wheelie” Like You

Honey Bear: Bee Mine

Favorite Soda: You make my heart bubble

Candy Worms: You wormed your way into my heart

Fav Candy: You’re sweet


Monday, December 5, 2011

Teacher Gifts

I don't know if you're like me at all; but I have the toughest time coming up with a (half-way) deceent gift for my boys teacher's at school every holiday season.
So....since I had to figure out a post for the Betties, I thought that I would get prepared
(and hopefully get your creative juices flowing)
for a great holiday gift for a teacher, friend or neighbor.
(b/c if I'm not thinking ahead, it usually doesn't happen!)

AND the great thing about all this is that it is extremely affordable.
Practically everything I got was for about $1.00 (with a few exceptions, of course)

*When it gets closer to the end of the school, I will post a picture of the completed teacher gift, I just didn't want some of this stuff sitting around for another three weeks getting stale and yucky. But I think that you'll get the general idea*
Let's get started!
Here'a what I'm starting with:

The cute little box to put everything in I found at Target in the $$ bins.


Gloves: 2/$1 @ Dollar Tree

Candy cane sticks @ Hobby Lobby for.....well you can see it: $2.49 --- but this will make you more than one little box.

boxes to put the candy cane sticks in at Hobby Lobby for $1.99 -- 4 to a package.

Little jar @ Hobby Lobby for $1.99

NOW, here is the inspiration for all of my goodies for my boys teachers:
Aren't these adorable?!?!
Microwaved Popcorn wrapped with gloves for the hat! So clever
(and functional at the same time!)
You can find the cute sowman wrapper printable at Sherelle Christensen

LOVE this one.....dipped candy cane sticks for a hot chocolate stirrer
--- super-easy to make and pretty to give.
Found @ countryliving.com in their 14 homemade food gifts.

And finally some homemade lemon sugar hand scrub found at Stephanie Lynn
(I've made this for the girls that I visit teach and they have LOVED this stuff
--- I think I need to make some for myself!)


You must know, that the inspiration for all these little goodies, I found at Pinterest.

I love the people that are creative enough to even think this stuff up so that
I have something great to give as gifts.
I will aslo be throwing in a handmade card from my child and
 an ornament to complete my little box for the teachers.

I can't wait until they are actually all done so that I can show it off.
It's gonna be super-cute!

Thursday, December 1, 2011

It's beginning to look a lot like Christmas...

Well, it's officially December 1st, which, in OUR house, means we decorate! (Yes, we are THOSE people, who ban Christmas decorating and music until we're officially in the month. It's only a teeny bit Scroogey of us...right??)

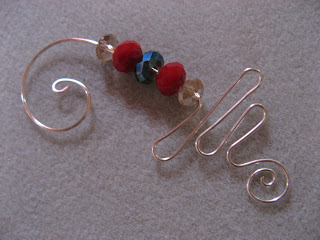
And in honour of Christmas decorating (or whatever other holiday you're decorating for - I think the signs downtown say "Merry Christmas," "Happy Hanukkah," "Happy Diwali," "Happy Eid" - if there are others then our fair city has overlooked something and I apologize on our ignorant behalf) I thought I show you this really cool little decoration that one of my best friends taught ME how to make last year! She did up a bunch as parts of Christmas presents for her friends at work, and I'm not going to lie, I did a bunch because they look so FABULOUS on my Christmas tree!

So, here we go!

You need:
  • 18 gauge [jewellery] wire (any colour) - I used approximately 12 inches for this one
  • beads - use as many as you can fit or as few as you like! Here I used 5 fabulously sparkly Chinese crystals - these beads look FABULOUS on the Christmas tree next to all those lights!
  • round-nosed pliers
  • wire cutters

Step 1: Measure and cut your wire.

Step 2: Grasp the very end of the wire with the pliers and turn the pliers so that you make a loop in the wire.
Step 3: Now, keep your pliers in that loop, grasp the other end of the wire with your opposite hand, and gently keep the twisting motion going, as though to make a loose circle. Just don't come all the way back around - you're making the hook that you're going to hang on your tree.
Step 4: Thread your beads on the unfinished end.
Step 5: Grasp the wire again with your pliers below where you want the beads to sit, and bend the wire around the pliers so that it's at least about 90 degrees from the beaded portion.
Step 6: Let go and then grasp the wire 1/2 to 1 inch from the bend, and wrap the wire around the pliers so that it's going back the other way.
Step 7: Let go and grasp the wire again, a little further than you did last time, so it's a bit off-kilter. Then wrap the wire back around the pliers so it's going the other way again. Kinda' like a loopy-zig-zag.  Do this back and forth a few times, until you're either sick of it or you've just got enough wire left to finish off. I did mine so there are uh, I dunno, 4 zigs. Yes, that's for SURE the technical term. ;-)
Step 8: Use your fingers or your pliers, whichever is easiest for you, shape your zig-zag by squishing the middles...
Step 9: Once you've got them shaped how you like it, grab the very tail of your wire with the pliers and make another loop just like you did in step 2 above.  Then, just like step 3 keep your loop going around, more loosely to make a wee spiral. It should be tighter than your hook was, but still a bit loose, yes?
Step 10: Step back and admire your awesome work!!
It's fanTASTICALLY simple, just a few bends and twists in your wire, with some sparkling beads and voila you have a decorative masterpiece to hang on your tree! The sparkly-er the beads the better it looks next to a mini lightbulb on the tree!! When ours goes up tomorrow night I can't wait to hang mine!

Give them out as gifts, add them to your gift-wrapping bows, whatever you please! They're simple, inexpensive yet classy, and add that handmade specialness to the gift-giving season.

Happy Crafting!

Monday, November 28, 2011

Christmas Penguin Ornament


We set up our Christmas tree today and i have to say that my penguin was a success and the middle of so many sparkling balls :)

It's as easy as you can see, and great for the environment. You only need:

an old light  bulb and suitable paint for glass!


You can start painting the white part and finish with the black, for the yes an nose you can use a pencil to help you.
I"m not a great painter buy i enjoyed doing that just like a child!!!!
Hope you enjoy too and find a way to recycle old items , helping our planet. I'm sure the kids will love to make that.


Thursday, November 24, 2011

DIY Pottery Barn Holiday Card Holder

Holiday Card Holder from PotteryBarn.com
My favorite stores include Restoration Hardware,Williams Sonoma and Pottery Barn. Often I can be found curled up in my favorite plush red velvet arm chair longingly browsing their catalogs, thinking of ways I can imitate the chic farmhouse look without having to pay the chic boutique prices.

This Holiday Card Holder can be found on the Pottery Barn website (or catalog) for the 2011 Holiday Season. In years past I have taped my cards from family & friends to cabinets in the kitchen, paper clipped them to twine, or tucked them anywhere I could to display the beautiful works of art.

That is, until now. This year, cards sent to my home (and yours!) can have a home of their own with this 6" x 72" DIY Pottery Barn inspired Holiday Card Holder.

Craft Ingredients:

Large gauge spool of wire (any major home repair store)
Wire cutters
Electrical pliers
Safety Glasses
Yard (Meter) stick
Floral wire (optional)
Black spray paint (optional)

Craft Directions:

1.) Measure & cut 5 strands of the large gauge wire at 80" in length. Four (4) of the strands will be the main body of the holiday card holder.

Steps 1 & 2.

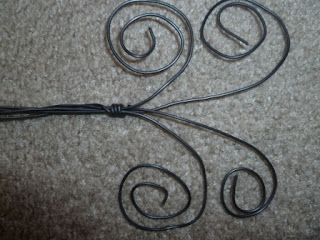
2.) Measure 4" from one end of the group of four (4) strands, and using the 5th cut strand of large gauge wire, wrap around the group of 4 strands three times. This can be done either by hand or using the electrical wire pliers. Repeat every 12", or one foot. There should be more wire left open, or un-wrapped, at the top of the Holiday Card Holder.

Step 3.
3.) Now that the body of the Holiday Card Holder is in place, use the electrical pliers to curl the bottom of the four strands of large gauge wire. Repeat step 3 with the top of the strands of the large gauge wire.

4.) Using your yard stick, measure and cut three (3) strands of large gauge wire at 64". The wire for this step can be substituted with floral wire, though not shown in the pictures of this project.

Step 5.
5.) Beginning at the bottom of the Holiday Card Holder, wrap one (1) strand of wire around the body two times, and then make a loop two times to one side. Wrap wire around body once, and make a loop two times to the opposite side, as shown in picture. Repeat until wire is completely wrapped around the body of the Holiday Card Holder. Repeat Step 5 two more times with each remaining strand of wire. (HINT- the shorter wires allow ease in creating the loops and wrapping around the body of the holder. One long wire is REALLY difficult to work with as it easily becomes tangled with everything it comes in contact with.)

6.) Optional Step. If you used floral wire to make the loops on either side of the Holiday Card Holder, now would be the time to spray paint the holder black to give it a unified look.

Finished Product. Looks JUST like the one from PB!
All in all, this project only took me 2 hours to make and I didn't have to spend the $49 price tag at Pottery Barn to create a home for my holiday greeting cards.

Thanks for stopping by! Please feel free to leave a comment or post a question. :) Kristen

Close up of Finished Product.

Wednesday, November 23, 2011

Paper Christmas Tree

Christmas is always a go big or go home holiday with our family. Usually the tree is up by now and carols are playing; however I became an Auntie this weekend and thus I am a little behind. It will be up soon though no worries. This is a craft I made last year and it was a lot of fun. I hope you enjoy!

Materials Needed:

Cardstock made into a cone about 7-8" high
Strips of double sided scrapbook paper cut about a half inch by 2/12 inches
an 8" piece of thin ribbon
Small terra cotta pot
Flower foam
Moss for base of tree in pot
foot long thin dowel rod
glue gun and glue sticks
scissors


The first step it the part that takes the most time. You want to take your strips of double sided scrapbook paper and glue them into loops. Ribbon can also be used as an alternate material. Careful to not bend and crease the paper loops. you will need to cut the corners off your loops as you get further up the cone.


Then you start glueing your loops around the base of the cone and work your way up keeping in mind to overlap your seams.

Once you get to the top tie your ribbon around the top to give it a nice finish.


Cut your flower foam to fit in your terra cotta pot. make sure it does not go above the height of the pot.
Add your moss and dowel and then you can put your finished tree on top of the dowel (glueing optional) and you are done! It makes a very cute, very country-ish Christmas decoration. Hope you like it!
-Rachel

Monday, October 24, 2011

Halloween Paper Pumpkin


Its Halloween  time and seems like everyone are thinking about that, so i'm too. And one more time papers can help in your decoration. You can make a lot of paper pumpkin, and use onother materials to improve this simple ideia.

To start the only thing that you'll need is  paper and glue.

First you  have to glue the paper strips together forming a circle

Then join the ends to form your pumpkin


And now you can decorate with everything that you can find at home!!! Happy Halloween everyone!!