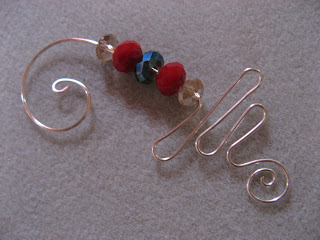
And in honour of Christmas decorating (or whatever other holiday you're decorating for - I think the signs downtown say "Merry Christmas," "Happy Hanukkah," "Happy Diwali," "Happy Eid" - if there are others then our fair city has overlooked something and I apologize on our ignorant behalf) I thought I show you this really cool little decoration that one of my best friends taught ME how to make last year! She did up a bunch as parts of Christmas presents for her friends at work, and I'm not going to lie, I did a bunch because they look so FABULOUS on my Christmas tree!
So, here we go!
You need:
- 18 gauge [jewellery] wire (any colour) - I used approximately 12 inches for this one
- beads - use as many as you can fit or as few as you like! Here I used 5 fabulously sparkly Chinese crystals - these beads look FABULOUS on the Christmas tree next to all those lights!
- round-nosed pliers
- wire cutters
Step 1: Measure and cut your wire.
Step 2: Grasp the very end of the wire with the pliers and turn the pliers so that you make a loop in the wire.
Step 3: Now, keep your pliers in that loop, grasp the other end of the wire with your opposite hand, and gently keep the twisting motion going, as though to make a loose circle. Just don't come all the way back around - you're making the hook that you're going to hang on your tree.
Step 4: Thread your beads on the unfinished end.
Step 5: Grasp the wire again with your pliers below where you want the beads to sit, and bend the wire around the pliers so that it's at least about 90 degrees from the beaded portion.
Step 6: Let go and then grasp the wire 1/2 to 1 inch from the bend, and wrap the wire around the pliers so that it's going back the other way.
Step 7: Let go and grasp the wire again, a little further than you did last time, so it's a bit off-kilter. Then wrap the wire back around the pliers so it's going the other way again. Kinda' like a loopy-zig-zag. Do this back and forth a few times, until you're either sick of it or you've just got enough wire left to finish off. I did mine so there are uh, I dunno, 4 zigs. Yes, that's for SURE the technical term. ;-)
Step 8: Use your fingers or your pliers, whichever is easiest for you, shape your zig-zag by squishing the middles...
Step 9: Once you've got them shaped how you like it, grab the very tail of your wire with the pliers and make another loop just like you did in step 2 above. Then, just like step 3 keep your loop going around, more loosely to make a wee spiral. It should be tighter than your hook was, but still a bit loose, yes?
Step 10: Step back and admire your awesome work!!
It's fanTASTICALLY simple, just a few bends and twists in your wire, with some sparkling beads and voila you have a decorative masterpiece to hang on your tree! The sparkly-er the beads the better it looks next to a mini lightbulb on the tree!! When ours goes up tomorrow night I can't wait to hang mine!
Give them out as gifts, add them to your gift-wrapping bows, whatever you please! They're simple, inexpensive yet classy, and add that handmade specialness to the gift-giving season.
Happy Crafting!


No comments:
Post a Comment